
Best Ways to Defend Consulate – Complete Rainbow Six Siege Site Breakdown (2025)
Introduction
Consulate may be one of the most played maps in professional play while being one of the least played in ranked. I don’t pretend to be all knowing, but this sure has me stumped. I do understand some of the distaste for Lair. Objectively, it’s a new map that does tend to favor shields in the current meta, but this reworked version of consulate does not have the same excuse.
Yes, shields are still strong here—but nowhere near as dominant. And while this updated Consulate plays very differently from the original, it still carries a level of familiarity that veteran players can appreciate—something Lair just doesn’t offer. Despite that, Consulate continues to be banned in favor of much more tired maps like Villa and Coastline (which, let’s be honest, we’ve all played more times than we’d like to admit).
Whether you're grinding ranked on your way to Champ or looking to add this map to your comp team’s map pool, this guide is here to help you better understand the map—and give you a rock-solid sample setup to test and build off of.
CEO/Meeting
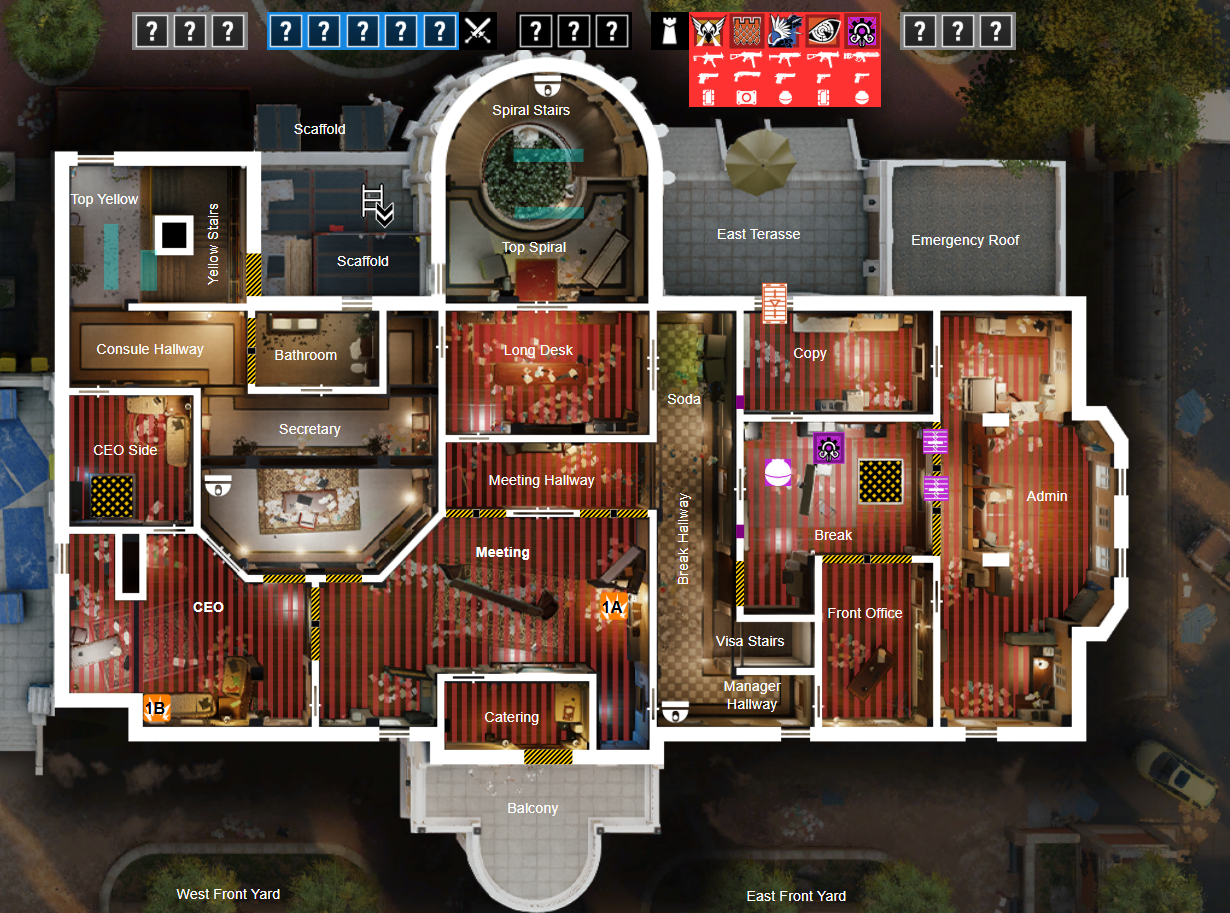
We start where nearly every ranked match on Consulate begins: CEO and Meeting. This top-floor site is undeniably strong, but it comes with a few major pitfalls that defenders need to watch out for.
How Its Attacked
Before we can talk about the best way to defend this site, we first need to understand how teams attack it. Disregarding rush plants on the CEO window, attackers usually take one of two routes:
Admin side push, or
CEO window + Yellow Stairs push.
The Admin Take usually begins with attackers opening the Catering wall, then taking control of Admin Office and the surrounding rooms. Once they’ve secured this area, they’ll use whatever utility they have left to clear Vending, watch for Long Desk swings, and challenge Meeting. These fights tend to favor defenders, but attackers will still try to brute force their way through. If they manage to clear Meeting without losing their whole team, they’ll push through Glow Door and attempt a plant in the corner—ideally without getting blown up by a Nitro Cell or soaked in Toxic Smoke.
The CEO Push is a bit more surgical. A coordinated team will send a Buck into Piano early to clear players sitting in CEO. Meanwhile, the rest of the team focuses on wiping out utility on Yellow Stairs. Once both CEO and Yellow are under control, the attackers place someone on Bathroom window, smoke off (or ego-challenge) Secretary, and slide into Couches. From there, the planter rappels into CEO window and gets the plant down with relative safety.
Admin takes are more common for uncoordinated teams or solo queue players because they create pressure across multiple angles and bait defenders into making mistakes. CEO pushes, while simpler and more linear, are extremely effective for coordinated 5-stacks but a pain to pull off with people wandering around the map aimlessly—but proper attacks are not what we’re focusing on today.
Strengths of the Site
When evaluating the strengths of any site, the first thing to consider is its power positions. These are the spots defenders can use to either deny plant attempts directly or control multiple points of entry. In short, they’re the areas attackers must clear—or at least respect—if they want a real chance at planting the bomb.
On the top floor of Consulate, attackers really only have two viable plant spots:
Just inside the CEO window, and
In Meeting, near the single door (commonly called Glow).
Because of this, the two most crucial power positions are:
Meeting (by the whiteboards) — the only position that can effectively contest a Glow door walk-in, and
CEO (near the connector window) — where a defender can swing or C4 the CEO window rappel with relative safety.
These two players essentially anchor the entire site. But that doesn’t mean everyone else gets to run wild and do their own thing—far from it. The rest of your team needs to play in support of these anchors, layering the defense with obstacles and crossfires that force attackers to burn time and utility just to get a chance at clearing the power spots.
Strong supporting positions include:
Long Hallway, especially by Vending (a shield + ADS/Wamai makes this a nightmare to clear),
Long Desk, to help pressure Admin-side entries,
Couches, for disrupting Yellow pushes, and
Secretary, to reinforce whichever side needs it more.
If you’re worried about vertical play from below (which is valid, especially against coordinated teams), having someone in Piano or Expo can help deny that pressure. But only commit to that if you have strong coordination—it’s not worth splitting your defense if attackers aren’t even trying to play vertical.
Sample Setup
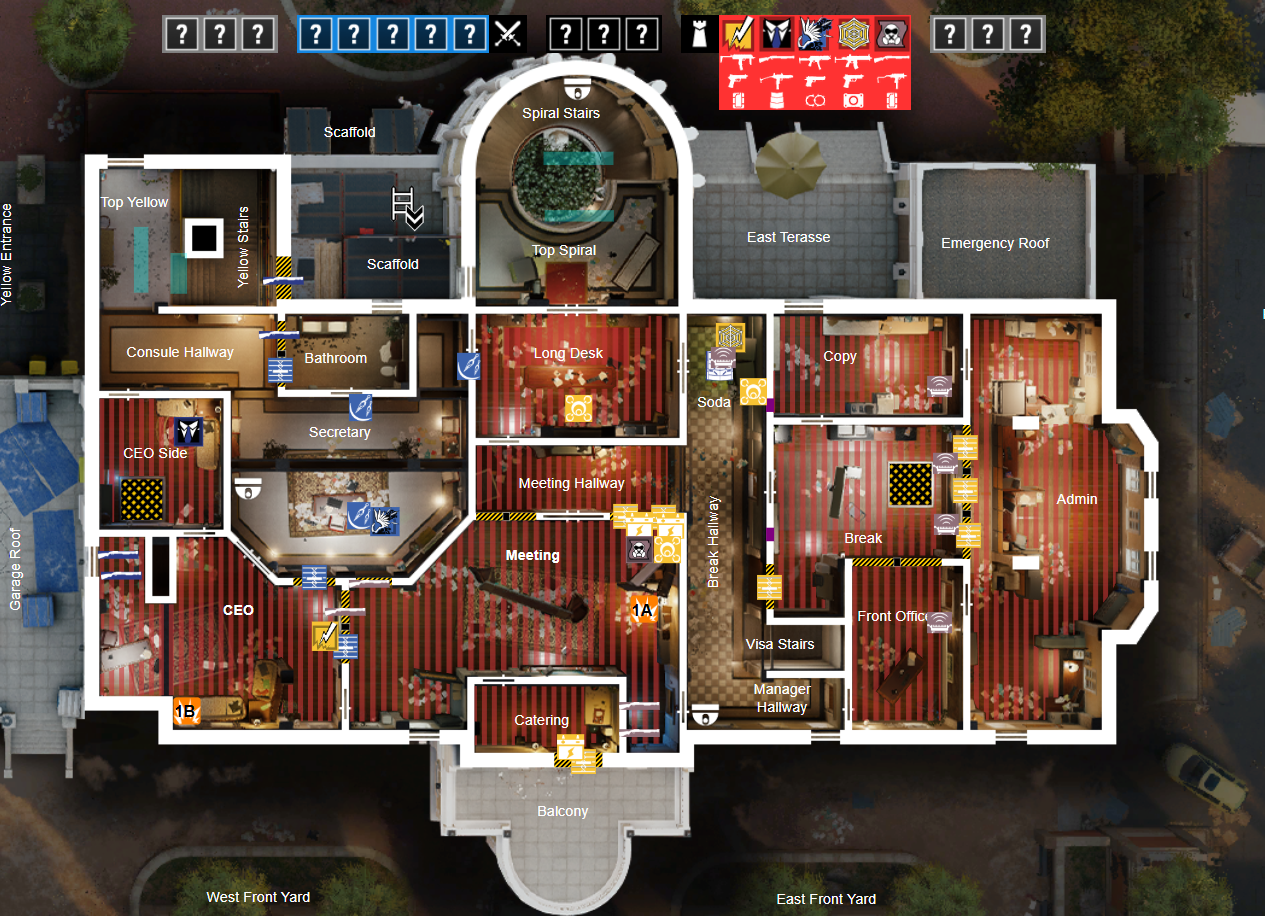
Bandit: Start in Catering and focus on tricking the Balcony wall. Most teams won’t invest much into opening it and will often leave it closed if they suspect a trick. Whether or not the wall gets opened, rotate back to the power position in CEO after about a minute and help contest whichever side the enemy is pushing.
Mute: It’s not the flashiest role, but this position becomes crucial in the late round—especially if the attackers are pushing from Admin. Your priority is survival. Don’t overpeek. Stay tucked in, and be ready to C4 the moment they walk through the single door.
Warden: Key to shutting down a Yellow take. Use the shotgun and play close while taking advantage of your flash immunity. Just be mindful of attackers below—if the hatch is open, they can catch you swinging Yellow stairs. Position accordingly.
Jager: Your job is to delay the Admin take and burn as much time and utility as possible. Start in Breakroom to shoot drones, but be cautious of the Copy window. If you're pressured, it’s okay to fall back. Don’t be afraid to give up the Vending shield early if you see a good timing to rotate safely to Long Desk.
Azami: You’re the glue for whichever side is under pressure. If the push is coming Admin-side, play Long Desk and support Jäger’s retreat. If it’s Yellow, anchor in Secretary and use your Kiba barriers to make any staircase swing a nightmare. Adapt your position to fill the gaps and fortify weaknesses.
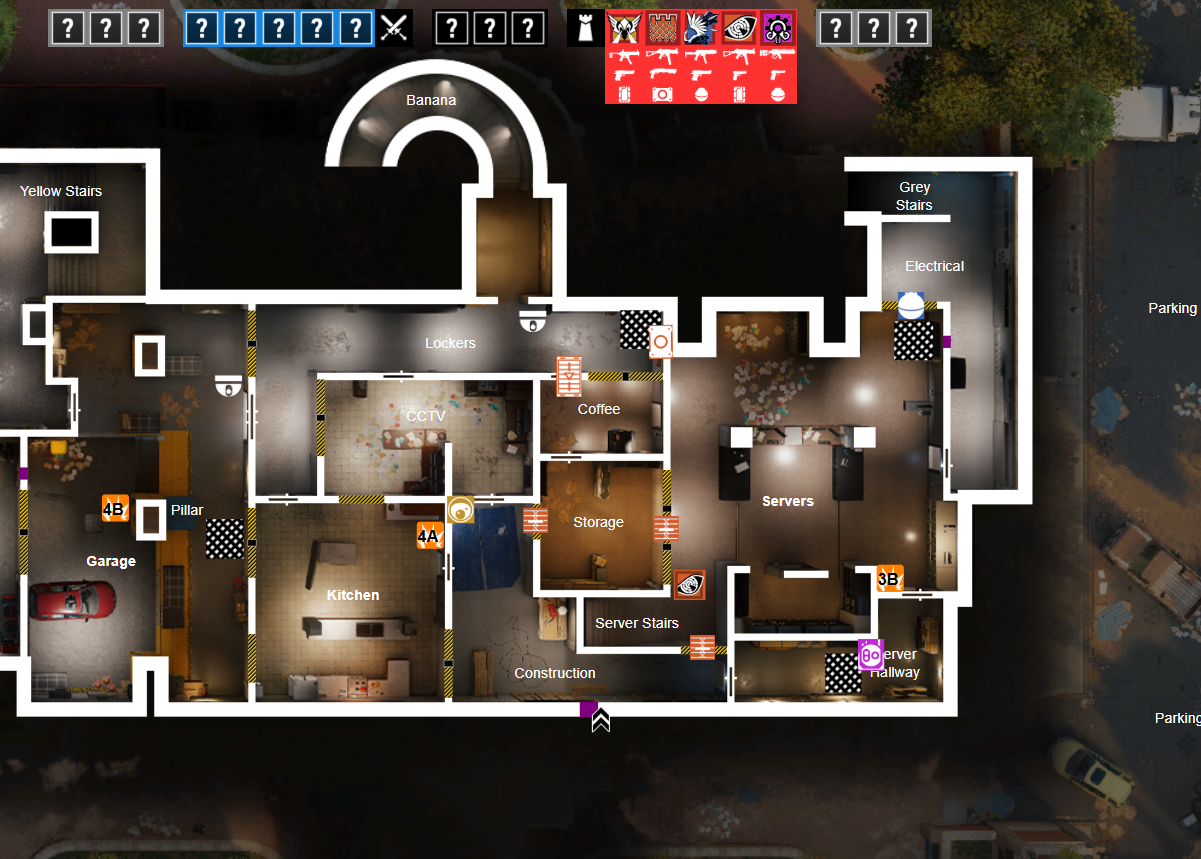
Garage / Kitchen
We now move to the second most played site on Consulate—realistically, the only other site anyone plays on this map. When properly set up, Garage/Kitchen can actually be stronger than the top floor. But here’s the catch: one or two misplaced reinforcements can completely flip the site from a fortress into a freebie for attackers.
How It’s Attacked
There’s a bit more flexibility in how attackers approach this site, but generally, teams lean into one of two main strategies:
Garage push (with vertical control)
Backside push through Kitchen and Spiral
The Garage Push is the more popular and structured of the two. Any competent team going this route will pair a hard breach on the garage wall with some degree of vertical pressure—typically from piano and expo. The goal is to clear defenders off key positions like Yellow Pillar, Red Car, and close Kitchen. Whether attackers actually open the hatch or not doesn’t matter too much—the threat of vertical play alone can force defenders out of position.
Once Garage is cleared and utility is dealt with, attackers funnel through the breach and aim to plant behind cover. Well-prepped teams will bring smokes, flashes, or even Osa shields to help the planter get in safely and arm the defuser.
The Backside Push is more chaotic and gunfight-heavy. Attackers will typically start by taking control of Archives, then open the Storage wall for a line of sight into Kitchen. This strategy is a lot like an Admin take on the top floor—it’s less optimal, but it creates pressure and baits defenders into swinging unnecessarily. One bad peek, and attackers can walk into site with minimal resistance.
A well-executed backside take will also include a lurker down Spiral to pressure Long Hallway and contest Security Door. If attackers manage to clear Kitchen and Security, they can safely plant behind one of the kitchen counters.
Strengths of the Site
The biggest strength of Garage/Kitchen is its openness—or more accurately, its potential openness. With the correct reinforcements and carefully chosen soft walls opened, defenders can set up crossfires that leave attackers exposed from multiple angles no matter how they enter. Good attacking teams try to solve this by applying pressure from as many directions as possible, but when done right, the defense still has the edge.
Because of this, the most effective power positions are spots that meet three key criteria:
Safe from vertical play
Can swing one angle without being overexposed to others
Oversee multiple points of entry into site
The two strongest power positions that meet these requirements are:
CCTV
Yellow Pillar (formerly known as Pipes)
CCTV is one of the most powerful anchor positions on the site. With the right walls opened or reinforced, the player here can cover Garage breach, Yellow Door, Spiral, Long Hall, Kitchen Door, and even Blue. The key strength of CCTV is isolated control—you can swing one angle at a time without being vulnerable to crossfires from others, assuming the setup is done correctly.
Yellow Pillar is also a great spot—but only if reinforced properly. Specifically, the left side of the Long Hall wall needs to be reinforced to give you extra cover from above and from late-round lurks down Spiral. When played carefully, Yellow Pillar lets you contest:
Long Hall
Yellow Door
Garage breach
Kitchen Door
Angles into CCTV and Blue
However, some of these angles (like Kitchen and CCTV) might expose you to vertical pressure or wide swings from breach, so don’t overextend or reposition unnecessarily.
Supporting players on this site have much more flexibility. Their role depends entirely on where the attackers are applying pressure. If the enemy is hitting from all directions, these players should focus on:
Gathering intel
Finding flanks
Getting aggressive on the weakest side of the attack
The goal is to disrupt attackers before they can isolate and overwhelm your anchor players in CCTV and Yellow. Those two anchors should focus on staying alive at all costs, while the rest of the team works to cut off paths, burn time, and prevent the attackers from building up coordinated pressure.
Sample Setup
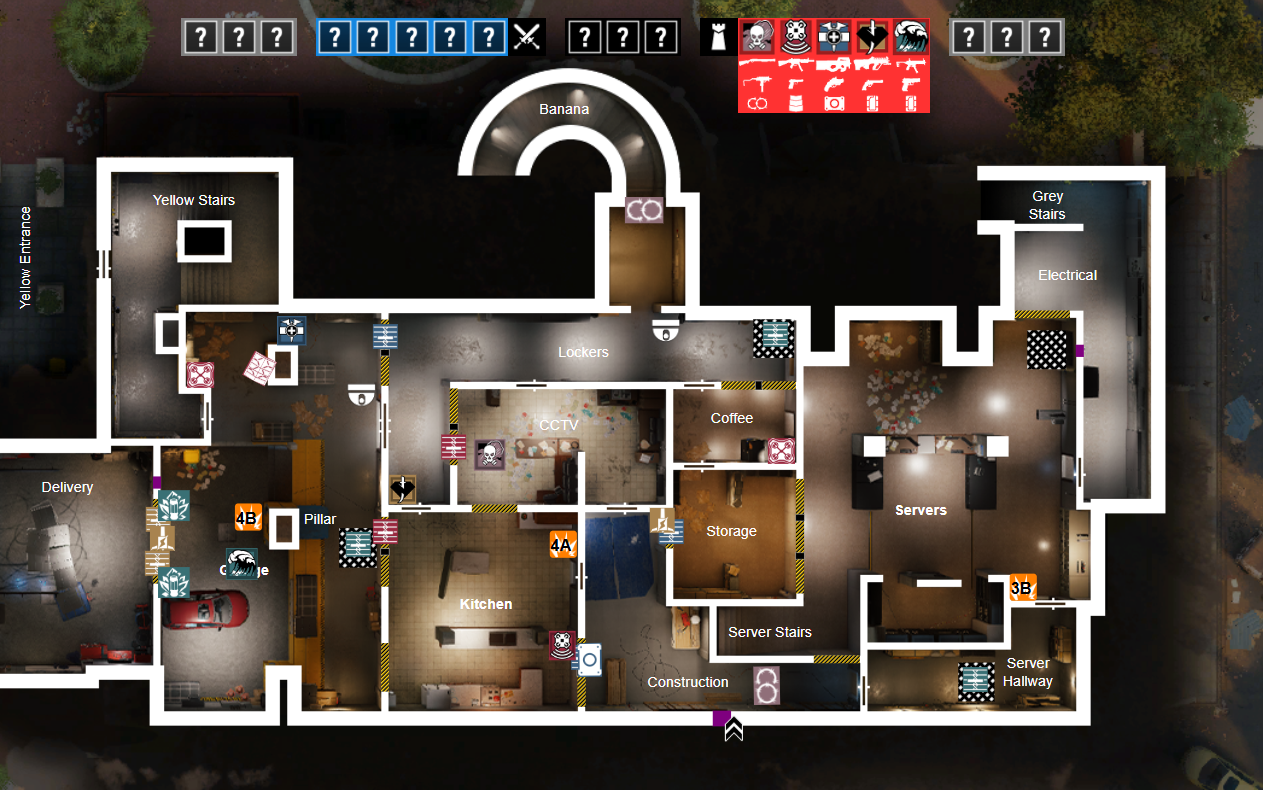
Smoke: Your main job is to lock down CCTV. Start on the Construction side if you suspect a Visa rush—your shotgun and smoke canisters are perfect for shutting that down quickly. After the early round, reposition to CCTV and hold it down for the rest of the round. Use your smokes to delay pushes, deny plants, and create opportunities for your teammates to swing off your utility.
Doc: As the pillar player, your positioning and discipline are everything. You must be hyper-aware of what lines of sight are open—especially if the attackers have vertical control. This position can feel claustrophobic with vert opened, but it’s also extremely difficult to clear if you don’t overextend. If attackers try to force you out with nades or firebolts, you can stim through the damage and hold your ground.
Tub/Kaid/Echo/whatever ops you choose to bring: These operators are here to gather intel, burn attacker utility, and waste time. Tube and Kaid work well together for keeping the wall closed, while Echo can provide strong site intel and plant denial.
That said, don’t feel locked into these picks—choose ops that suit your team’s playstyle. Need better guns? Try Ela or Melusi. Want more delay? Jäger, Maestro, and Bandit are great alternatives. This role is all about supporting the overall setup and flexing based on what the enemy is doing.
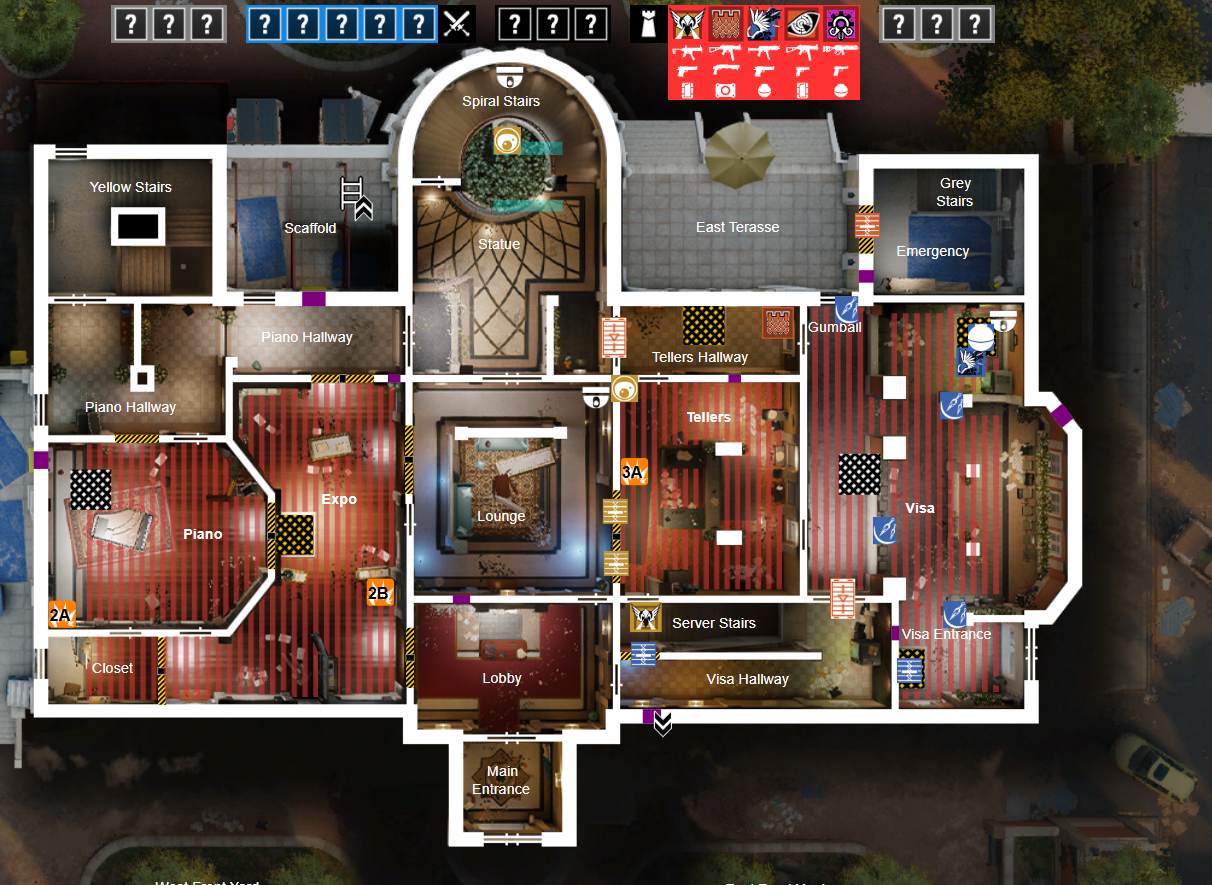
Piano/Exposition
We move right along into unknown territory. The only reason most teams end up on this site is if they’re already up 2-0. But I always love the tertiary sites, especially on lesser known maps. More often than not the tertiary bomb site can be played very similarly to one of the other ones, just with a bit more vert. You can think of this bomb site like vents and workshop on Border…but better.
How It’s Attacked
As with most tertiary sites on lesser-played maps, there isn’t always a coherent plan when it comes to attacking this bomb site in ranked. In competitive play, however, teams generally approach it as if the site were CEO/Meeting, opting for a top-floor clear—just executed faster, so they have time to establish vertical control before the final push.
Since defenders typically don’t commit all five players or ten reinforcements upstairs, attackers have a much easier time taking the top floor—especially with an Admin-side push. Without enough utility, manpower, or structure, defenders are often forced to give up control earlier than they’d like.
A well-coordinated team won’t just bulldoze through Admin. They’ll send one or two players toward Yellow/Bathroom side to time a crunch, collapsing onto the remaining roamers. This usually ends in a quick and bloody fight that can completely decide the round. Once control is secured, attackers will typically either:
Push down Yellow stairs, or
Drop the hatch and plant behind the Grand Piano
It’s also worth mentioning an alternative approach—the rush. If attackers suspect (or confirm) that three or more defenders are upstairs and there’s little or no vertical setup, they may choose to hit the site immediately. A fast rush into Lobby or Piano can completely bypass defenders still rotating or setting up above.
Because of this, it’s crucial for defenders to stay aware during the first 30–45 seconds of the round. Even just one anchor watching for the rush can buy the time needed to rotate back and recover.
Strengths of the Site
The core strength of this site is also its greatest vulnerability: the entire site is exposed to vertical play. This forces defenders to commit to holding top floor, but it also forces attackers to clear it if they want any hope of getting the defuser down. In other words—whoever controls top floor, controls the site.
Because of this, the true power positions for Piano/Expo aren’t even in the bomb site itself—they’re upstairs.
You might assume that holding the top floor means the same power spots from a standard CEO/Meeting defense still apply. If only it were that simple.
Yes, CEO (by Connector window) is still a legitimate power position. It provides strong control over multiple entry points, and its vertical angles into site make it critical for denying plants or late pushes.
However, Meeting is no longer a power position in this context. Since its vertical coverage into site is limited and easy to avoid, it loses much of its value.
Key Power Positions
Couches (Admin side)
This becomes one of the most impactful positions for defending the site. With a hatch that drops directly into site, plus the ability to open up angles toward Benches, Yellow stairs, and site entrances, Couches controls the tempo of the round. It’s also crucial for denying Yellow lurks or top floor crunches.CEO (Connector window)
As mentioned earlier, this spot allows you to contest Meeting, Short, Yellow, and Lobby Breach, while also providing valuable vertical control over the site itself. It’s a staple position when defending both upstairs and this site—just be mindful of crossfires or unexpected pressure from Admin-side attackers.Secretary
While not a power position in the strictest sense (you can’t directly stop the plant from here), Secretary is essential for holding top floor. It provides natural cover from the desk and pillars, and lets you support both Meeting and Yellow side. You can also deny a Long Desk push, which helps protect your CEO and Couches anchors.
The remaining defenders—those playing on or near the actual bomb site—have one job: stop attackers from walking in for free. As long as these players hold site and delay, your top-floor anchors can focus entirely on denying vertical control and winning the round from above.
But if those anchors overpeek, get isolated, or die early, the entire setup collapses. No matter how strong the power positions are, the players here can’t defend the site and fend off a top floor clear at the same time.
Sample Setup
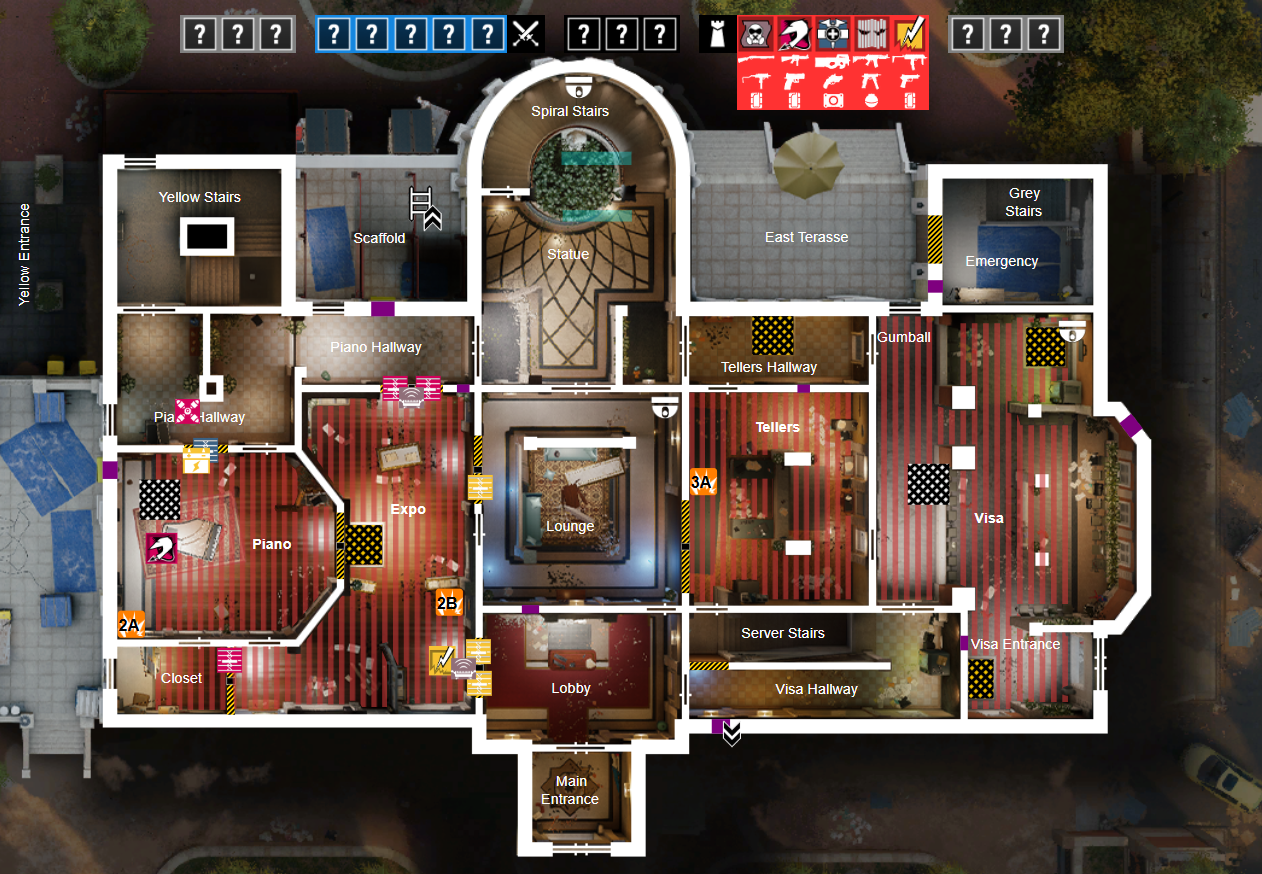
Mozzie: After placing your pests—ideally around Admin—your job shifts to anchoring and denying site pushes. Playing from behind Grand Piano is a safe and impactful position, especially for late-round denial. Just be cautious: don't get caught on cams, as it's easy for attackers to sneak in through Piano Door if no one’s watching it.
Bandit: As the second anchor, you’ve got two viable openers:
Try to Bandit trick the Lobby wall, or
Start top floor and attempt to trick the Catering wall.
If you go top, make sure the team knows Mozzie is solo on site early. Regardless of where you start, rotate back quickly and lock down Expo. Hold wherever offers the safest angles to delay the push.
Doc (or anyone with an Acog): You’re playing the most influential position on the map. From this post, you can contest players pushing Admin, support Yellow Stairs, and challenge Long Desk to Secretary. With vertical holes opened, you can also see Expo Door, Piano Door, and the Closet Window. If you hold your angles and land your shots, you can swing the round on your own.
Mute: Your role is to shut down a Yellow take, whether attackers are hitting top floor or mid. Use vert to watch Yellow Double Door, Benches, and Piano Closet Door. Leverage your shotgun and SMG-11 for close-quarters dominance. Don’t overpeek—just hold strong and burn time.
Vigil: With minimal vertical pressure in your zone, you’re here to support Doc and Mute. Use your ability to make any push through Long Desk feel risky and unpredictable. If your teammates need to rotate or fall back to site, you’re the insurance policy holding top floor control and keeping attackers uncomfortable.
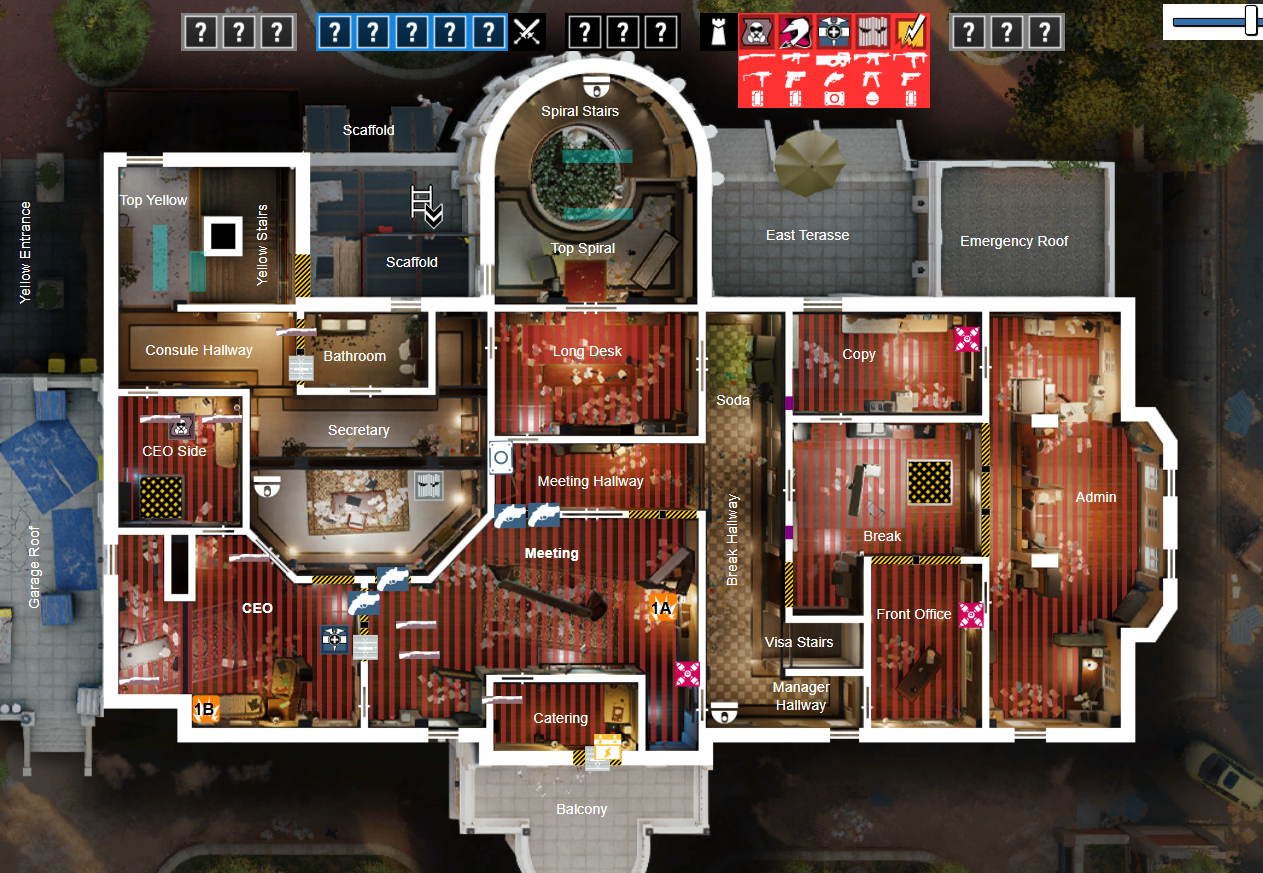
Archives/Tellers
I genuinely believe this might be the least played site in ranked across every map in the game. Honestly, I’d bet that even the bomb sites on Emerald Plains get picked more often—and no one even knows how to play those. But since everyone’s equally lost there, players are at least willing to experiment. On Consulate, though? The one thing everyone thinks they know is this: "You don’t go Tellers/Archives."
And I get the hesitation. It’s a split-level site, which sounds scary on paper—half the bomb is upstairs, half is down, and that’s a nightmare for coordination. But with the right approach and team setup, it’s a lot more manageable than people give it credit for.
How It’s Attacked
Since this site is basically mythical in ranked, if you’re bold enough to actually pick it—here’s what to expect: crouch-walking attackers. Don’t hold your breath for a structured take. There’s no “clear top, take map control, execute with utility” kind of flow here. The most coordinated thing you're likely to see is a team opening the Electrical wall, funneling down the hallway, opening the Archives wall, and trying to stick a plant—maybe with a lurk or two thrown in for chaos.
In competitive play, though, you’ll run into two more structured approaches:
A Tellers push with vertical pressure from above (CEO/Meeting or Lounge/Spiral), or
An Archives push from Garage and bottom Spiral.
That means Tellers/Archives is one of the rare sites with three viable angles of attack, which makes defending it even trickier—and is probably why most players avoid it like the plague.
The biggest problem attackers face is vertical pressure.
If they push Tellers, they have to deal with defenders playing above, or send someone on a flank-watch/lurk downstairs to stop C4s from raining down on the plant.
If they push Archives, they need to pressure Tellers too—otherwise, defenders can shoot down from top floor and ruin the plant.
And that’s the catch: there's so much vertical control defenders can use, it’s nearly impossible for an uncoordinated team to cover everything before attempting a plant. But this overwhelming complexity for attackers can actually make the site surprisingly viable—especially with solid intel and map knowledge on defense.
Strengths of the Site
As mentioned earlier, attackers have a lot to worry about when dealing with Tellers/Archives. A Tellers push alone requires clearing and watching:
Breakroom and Printer (above)
Visa Office (adjacent)
And making sure no one is able to C4 from Below
That’s three different vertical layers of threat, with a dozen different angles to account for. An Archives push isn’t much easier. Attackers must:
Clear Tellers, to prevent vertical pressure
Deal with defenders in Archives, Electrical, and Blue Hall
And watch for flankers from Spiral, Yellow, or any hatch drops
Power Positions (Sort Of)
This site doesn’t have traditional “lock-down” power positions like other sites. Instead, your strength lies in mobility and layered defense. That said, a couple of strong anchor spots include:
Visa by the Vending Machine – especially deadly with Azami setups. You can delay pushes, cut rotations, and threaten vertical clears.
Archives, with the ability to rotate into Storage as needed
However, these spots only become strong when used dynamically.
The Visa player can’t stop a full Archives or Tellers take directly, but if Visa control is lost, it tightens the noose around every other defender.
The Archives player needs to adapt based on the enemy’s push:
If the attackers are coming from Garage, this player should be tucked behind the Archives pillar, causing delays and drawing attention.
If the push is through Tellers, they need to rotate to Storage or further forward, ready to toss a C4 onto the plant spot.
Real Strength: Layered, Fluid Defense
This site doesn’t reward static defense—instead, it rewards mobility, coordination, and flexibility.
Rather than locking down fixed positions, focus on building a layered defense:
Spread out early
Shoot drones, waste time, burn utility
Then fall back to your next layer of defense
Done right, attackers will finally reach the bomb site with:
No drones
No utility
No clean entry points
No plant coverage
At that point, all they have left is a desperate flood, trying to brute-force their way in—and you’ll have all the angles, cover, and crossfires ready to shut it down.
With so many different defensive positions to play from, and vertical options to fall back to, this site can actually be an easy lockout—as long as you play it fluidly, not stubbornly.
Sample Setup
Pulse: Easily the most passive role early on—but potentially the most important late-round. Your main job is to gather intel using your heartbeat scanner and call out enemy positions to teammates. That said, don’t tunnel vision. Cycle through cams regularly and keep situational awareness high. Ideally, you’re setting up for a clutch C4, not depending on one.
Castle: You’ll mostly anchor near Tellers hallway, but don’t be afraid to start the round with controlled aggression. Consider:
Peeking Visa Window if attackers are opening Electrical wall
Delaying your Spiral barricade to shoot drones or catch early info
Just be mindful—lurks up or down Spiral can happen fast. Don’t get caught out of position.
Valk: You’ve got flexibility in how you start the round. Roaming top floor near CEO, then dropping Visa hatch into Tellers is a strong option. Place your cams smartly and stay mobile, but be careful—lack of sound cues doesn’t mean the area is safe. Timing and awareness are everything.
Azami: One of the few semi-stationary roles this round. Use your Kiba Barriers to reinforce team rotates and lock down Visa control. With smart placement, you can make pushing you a nightmare. Bonus: opening Electrical single wall gives you a strong counter angle onto the gray staircase.
Skopos: Arguably the most dynamic role in this setup. Your job is to delay a top-floor push while keeping your clone ready for reactionary plays. If attackers ignore you and commit to a Tellers plant, you may walk away with easy kills. If they go Garage > Archives, consider cloning back to site—or flanking first for a surprise play. Be fluid and adapt based on info.
All Said and Done
Consulate may not be the easiest map to master, but it’s far from unplayable—especially if you understand how each site is meant to function. Whether you're locking down CEO with surgical crossfires, anchoring Garage with layered denial, or turning chaos into control on the map's most controversial sites, the key to success on Consulate is structure.
This guide isn’t just about setups and power positions—it’s about changing the way you think about the map. Every site on Consulate has its strengths, even the ones ranked players tend to avoid. With the right setups, operator choices, and an adaptable mindset, you can take control of the round before attackers even figure out what’s happening.
So the next time you load into Consulate, don’t default to bans or autopilot strats. Use this guide, think ahead, and outplay the meta. You’ll not only win more games—you’ll make a map that most players hate feel like one of your strongest.